If you want to get paid on time, your invoice needs to be just as high-quality as your paint job. A good painting invoice lists out what you did, how much it cost, and when payment is due. Invest in tools that make invoicing quick and easy, and ask for a deposit up front. You can also give clients multiple ways to pay, whether that’s by credit card or through financing.
Inside this Guide:
- What Needs To Be Included in Your Painting Invoice?
- What to Charge on Your Painting Invoice
- 3 Painting Invoice Tips
- Improve Payment Rates
- Free Painting Invoice Example
- Painting Invoice FAQs.
Table of Contents:
- What Needs To Be Included in Your Painting Invoice?
- What to Charge on Your Painting Invoice
- 3 Painting Invoice Tips
- Improve Payment Rates
- Free Painting Invoice Example
- Send Professional Invoices with Joist
A painting invoice should list your business and client details, an invoice number and date, a line-item breakdown of labor and materials (paint, primer, and supplies), the total amount due with any applicable tax, your payment terms, and accepted payment methods. Add a signature line, and if you’re working on a home built before 1978, your lead-safe certification number.
Get these details right, and your invoice does more than bill the job. It shows clients exactly what they’re paying for and helps you get paid faster.
Learn why painting invoices are important, what information to include, and how to create one that looks as professional as your paint job. Discover some tips to make sure you get paid on time and keep your business running smoothly.
RELATED ARTICLE — How To Start a Painting Business: 7 Essential Steps
What Needs to Be Included in Your Painting Invoice?
Learning how to write a painting invoice is key to running a successful business and getting paid on time. Think of it as a detailed map of the work you’ve done. Here’s what to include:
Business and Client Details
- Business Name and Address. This shows who you are and how to reach you.
- Client Name and Address. It’s important to know who you’re billing and for the client to know you sent the right invoice. If the job site is different from the billing address, such as a rental property, list both.
- Invoice Number. This helps track your painting jobs.
- Invoice Date. Knowing when you sent the bill is important for you and your clients’ records.
Job Line Items
- Line-Item Description. Break down each aspect of the work you did, and separate prep (scraping, sanding, patching, priming) from paint application so clients can see where the money’s going. For example: “Scraped, sanded, and primed the trim, then applied two coats of finish paint on 14 exterior windows.”
- Materials and Paint Used. List the brand, product line, sheen, and color code, plus quantity, for each paint, primer, and sundry (tape, drop cloths, caulk, brushes, rollers) used on the job. This makes it easy to match colors and materials if a client needs a touch-up later.
- Change Orders and Extras. If the scope changes mid-job, such as extra trim added, wallpaper removal, or drywall repair that wasn’t in the original quote, list it as its own line rather than folding it into the total. This keeps the added cost visible and avoids disputes.
- Cleanup and Disposal. If you’re charging for hauling away leftover paint, debris, or packaging, list it as a separate line item so it doesn’t get mistaken for labor or materials.
- Hours Worked. If you charge by the hour, list how long the job took, broken down by task or room, if it helps clarify the bill.
- Amount Due. Write out the total cost of your painting services and materials.
- Taxes. Don’t forget to add any necessary taxes.
Compliance and Trust
- Warranty Terms. If your work comes with a warranty, note the coverage and start date on the invoice. It’s a small addition that builds trust and gives clients something to point to if an issue comes up later.
- License Number and Lead-Safe Certification ID. If you’re working on a home or child-occupied facility built before 1978, U.S. federal law (the EPA’s Renovation, Repair, and Painting Rule) generally requires you to be lead-safe certified. Note your certification number on the invoice — it’s good practice and reassures clients you’re compliant. Check your state’s contractor licensing rules, too, as these vary.
- Customer Signature. Getting the invoice signed by the customer shows they understand the information. This is useful if disputes arise.
Payment Info
- Payment Information. Make it clear how your client can pay you by listing all the payment methods you accept and how they can use them.
- Payment Terms. Let your client know when payment is due and list incentives and penalties for early and late payments.
RELATED ARTICLE — How To Get a Painter’s License: Requirements and Top Tips
What to Charge on Your Painting Invoice
Pricing varies by region, job type, and experience, but it helps to have a benchmark. According to the U.S. Bureau of Labor Statistics, the median wage for construction and maintenance painters was $23.40 an hour ($48,660 a year) as of May 2024.
| Percentile | Annual Wage |
|---|---|
| Lowest 10% | Under $36,680 |
| Median (50th) | $48,660 (about $23.40/hr) |
| Highest 10% | Over $76,550. |
Source: U.S. Bureau of Labor Statistics, Occupational Employment and Wage Statistics, May 2024.
Keep in mind this reflects wages for employed painters, not what a contractor bills a client. Your invoice rate needs to cover more than your own labor: materials, business overhead, insurance, drive time, and profit margin, so most painting contractors build their billing rate up from this benchmark rather than charging it directly.
Check rates specific to your region, and adjust for your experience and any specialty work, like cabinet refinishing or historic home restoration.
3 Painting Invoice Tips

Creating and managing painting contractor invoices doesn’t have to be a pain. Here are some tips to make the process smoother and help you get paid faster:
1. Use an Invoice Management System
Think of an invoice management system as your personal assistant for paperwork. Painting invoice software keeps all your invoices organized and easy to find. With a good system, you can quickly create invoices, track painting invoice payments, and even send reminders to late clients.
Many systems, like Joist, let you access your invoices from your phone or tablet. That means you can create or send an invoice right after finishing a job, saving time for both you and the client.
2. Build Better Estimates
A solid estimate is like a blueprint for your invoice. When you take the time to create detailed painting quotes, it’s easier to turn them into invoices later. Include all the costs you can think of, including paint, supplies, overhead, and a little extra for unexpected issues that may come up.
Your clients will appreciate knowing what to expect. A clear estimate can help avoid surprises when it’s time to invoice, making it more likely you’ll get paid without any hassle.
From One of Our Partners — How to Write a Price Increase Letter (with Templates)
3. Make It Easy for Clients to Pay You
The easier it is for clients to pay, the faster you’ll get your money. Offer several payment options, such as checks, credit cards, and online payments. Some painters use mobile payment systems that let clients pay on-site using their phones.
Putting clear payment instructions on your invoice can make a big difference. Tell clients exactly how they can pay you and when payment is due. The clearer you are, the less likely you are to run into delays or misunderstandings.
Explore More — Free Painting Invoice Templates from Joist
Improve Payment Rates
Getting paid on time is crucial for keeping your painting business running. Here are three strategies to help make sure your cash flows as smoothly as your paint:
1. Request a Deposit
Asking for a deposit before you start painting shows the client is serious about the job. It also gives you some upfront cash to cover initial expenses.
Be sure to mention the deposit in your initial estimate and deduct it from the final painting invoice. More involved painting jobs typically call for higher initial deposits than simpler ones.
2. Include Custom Payment Terms and Invoice Due Dates
Your payment terms are like the rules of the game. They tell your client when and how to pay. Common terms include “Due on Receipt” and “Net 30” (meaning payment is due within 30 days).
Choose terms that work for both you and your clients. If you’re working on a large project, consider progress invoicing, billing at set milestones as the job moves forward, so you’re not waiting until the very end to get paid.
3. Set Up Customer Financing
Sometimes clients want your painting services but struggle to cover the full cost upfront. Offer financing options as a helping hand. It makes your services more accessible and can lead to more jobs.
You don’t have to be a bank to offer financing. Many painters partner with financial companies that specialize in home improvement loans. These companies handle the credit checks and payments, while you focus on what you do best: painting.
By offering financing, you can land bigger jobs or work with clients who otherwise wouldn’t be able to afford your services. Just be sure to explain the terms and any interest rates involved clearly.
FROM ONE OF OUR PARTNERS — Free Painting Invoice Templates
Free Painting Invoice Example
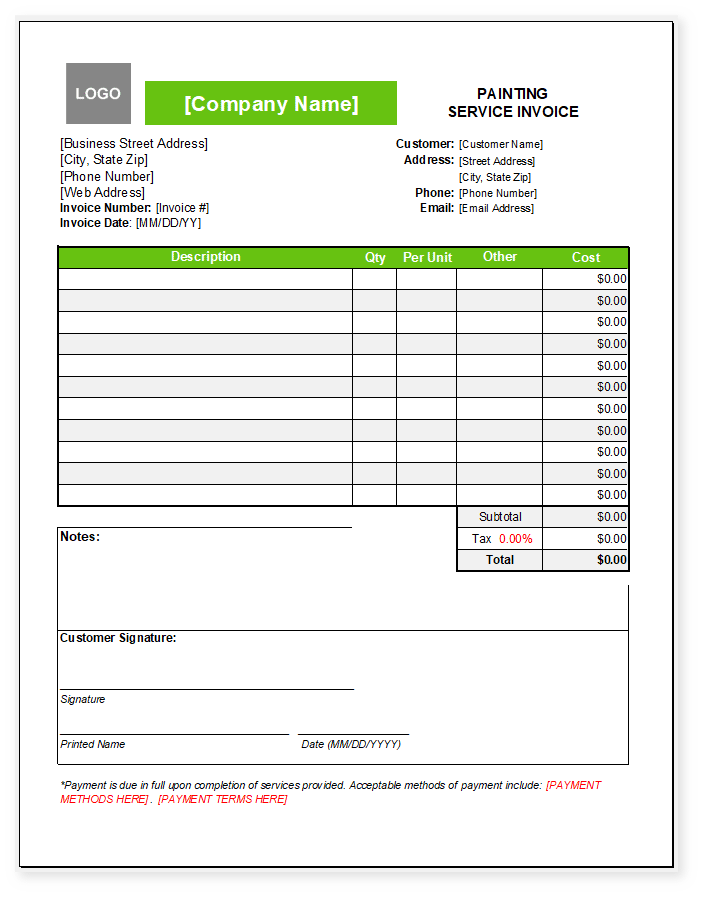
Using a painting invoice template saves you time and headaches. It’s like having a pre-sketched canvas. You just need to fill in the details. A good house painting invoice example ensures you don’t forget any important information and helps your business look professional.
Most free invoice templates can be customized to fit your needs. You can add a logo, choose which information to include, and adjust the layout to match your style. This way, your invoice becomes part of your brand, just like your painting work.
Here’s a house painting invoice example, laid out clearly for inspiration:
Painting Invoice FAQs
What should a painting invoice include?
How do I write an invoice for a painting job?
When should I send a painting invoice?
What’s the difference between a painting estimate and a painting invoice?
Do I need a license or lead-safe certification number on my painting invoice?
Send Professional Invoices with Joist
Make invoicing easy with Joist. It lets you create and send invoices in minutes, with an easy-to-use mobile invoicing and estimating tool. Create estimates, convert them to customizable invoices, and offer your customers flexible payment methods.
Joist’s professional painting invoices help you simplify your finances and spend more time focusing on your clients.