

Construction work is complicated, and there’s a lot to keep track of. Delays can cause upset, too—your clients feel let down, which affects their experience.
The antidote? A structured and strategic approach to scheduling.
A construction schedule is the foundation for smart and effective project management. It brings all the important information into one comprehensive document.
In this complete guide, we’ll explain what a project schedule is. We’ll discuss why construction scheduling is important and the common types used.
We’ll explore what should be included in every construction timeline. Then, we’ll walk through the six steps to creating a building schedule.
We’ll share two construction schedule examples and wrap up with a couple of pro tips.
RELATED ARTICLE: How to Make an Estimate for Construction (in 7 Steps)
What Is a Construction Schedule?

A construction schedule is a detailed plan. It shows every task involved in a building project and when it needs to be done. It also lays out who’s responsible for making what happen.
The document aims to keep everyone on the same page.
The key components include the following:
- Project timeline: A breakdown of phases, from site prep to final inspections and handover.
- Task dependencies: Which steps need to happen before others can begin.
- Resource allocation: Who’s doing what, when, and with what materials or equipment.
- Milestones and deadlines: Checkpoints to track progress and due dates.
- Contingency plans: Backup strategies for those inevitable, unexpected hiccups that pop up along the way.
We’ll explore these elements in more detail below.
FROM ONE OF OUR PARTNERS: How to Manage Construction Projects
Why Is Construction Scheduling Important?

Construction projects have so many moving parts and interdependencies. A construction schedule keeps those parts working in sync. It’s that simple.
Let’s take a closer look at the core reasons why scheduling is a must.
Boosts Project Efficiency
You know how the saying goes: time is money.
By mapping out every stage, a project schedule helps you get more done in less time. Better yet, it prevents unnecessary downtime. You don’t want to see workers standing around or hear machines running idly!
Hours—even days—saved translates to lower labor costs and better use of resources. It’s good for business and your customers.
Cuts the Risk of Delay
Construction is like a line of dominoes. If one piece isn’t in the right place, the rest don’t fall as planned.
Delays ripple out, causing:
- Higher labor and material costs
- Unhappy clients
- Scheduling conflicts with specialist trades
- Wasted resources
Improves Coordination
Teamwork makes the dream work—or, should we say, the construction process work!
Practical Engineering captures the importance and complexity of team coordination perfectly:
“We don’t know which contractors are busy and which ones aren’t, what machinery they have, or whether or not they’ll bid on your project.”
Sound familiar? A solid construction schedule eliminates this mental guesswork.
Every stakeholder—contractors, suppliers, crews, and clients—plans ahead. They know when they’re expected on-site.
Supports Budget Management
A well-structured schedule makes sure the project is financially feasible.
Every extra day on-site costs money. But smart scheduling helps you find ways to consolidate work and resources.
For example, instead of bringing in heavy equipment on two separate days for different tasks, a schedule could group those tasks together. One mobilization instead of two means fewer transportation costs.
Common Types of Building Schedules
You and your team have a unique way of working. It makes sense for you and your clients.
For this reason, it’s well worth investigating different types of building schedules. That way, you can find one that fits like a (safety) glove.
Here are some of the most common types.
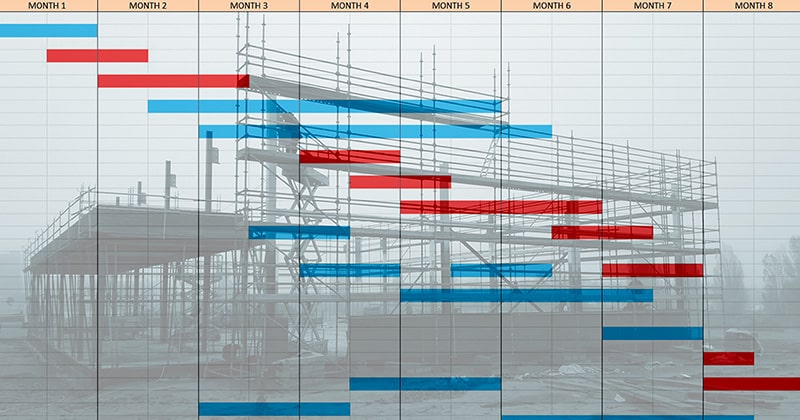
Gantt Charts
A Gantt chart is a visual timeline that maps out project tasks, their duration, and how they overlap. It’s like a construction to-do list but laid out in an easy-to-read bar chart.
Benefits:
- Gives a clear, at-a-glance view of tasks and deadlines
- Helps track progress in real time
- Makes it easy to spot scheduling conflicts
Potential drawbacks:
- Can get overly complex for large projects
- Doesn’t always reflect dependencies between tasks
Works best for: Small-to-medium projects with straightforward timelines. Tasks that don’t have heavy interdependencies.
Milestone Schedules
A milestone schedule looks at key phases and major deadlines—not the finer details. It’s less about the day-to-day and more about hitting critical progress points along the way.
Benefits:
- Keeps things simple by focusing on big-picture progress
- Makes sure the project stays on track
- Provides flexibility for teams managing the smaller details independently
- Ideal for client-facing reports—they don’t need to see every little task
Potential drawbacks:
- Lacks detailed tracking of individual tasks
- Doesn’t help with daily workload management
Works best for: Larger projects where high-level oversight is more important than micromanaging every step.
Critical Path Method (CPM)
CPM identifies the longest sequence of dependent tasks—AKA the “critical path.” If any task on this path gets delayed, the entire project timeline is pushed back.
Benefits:
- Prioritizes the tasks that truly matter for on-time completion
- Allocates resources efficiently by highlighting critical areas
- Reduces wasted time by pinpointing where delays could be costly
- Great for complex projects with lots of moving parts
Potential drawbacks:
- Requires detailed planning upfront
- Assumes task durations are predictable, which isn’t always the case in construction
- Doesn’t account for unexpected changes or disruptions well
Works best for: Large, complex projects that can’t afford delays.
FROM ONE OF OUR PARTNERS: Commercial Construction vs. Residential Construction: 6 Differences You Should Know
What Should Be Included in a Construction Project Schedule?
Let’s dive a little deeper into the elements that make up a solid construction scheduling document.
Tasks
- What it is: A detailed breakdown of the work that needs to be done.
- Why it matters: Without a clear task list, things get messy really fast.
- How it’s included: Each task is listed, assigned to a team or subcontractor, and given a timeline.
- Example: Framing the structure, installing electrical wiring, pouring the foundation, and so on.
Project Timeline
- What it is: The total duration of the project, from start to finish.
- Why it matters: Keeps the project on track and ensures deadlines aren’t just optimistic guesses.
- How it’s included: A clear start date and end date are mapped out in the schedule.
- Example: A six-month residential build with specific phases like foundation work, framing, and finishing.
Milestones
- What it is: The major checkpoints that mark progress.
- Why it matters: Motivates teams and clients and keeps up the project’s forward momentum.
- How it’s included: Highlighted as dates in the schedule.
- Example: Completing site preparation or obtaining final inspection approval.
Task Dependencies
- What it is: The logical order of tasks—what needs to happen before something else can start.
- Why it matters: Ensures the project moves along without preventable holdups.
- How it’s included: Tasks are linked in scheduling software, so teams know what needs to be done first.
- Example: Drywall installation can’t begin until electrical and plumbing rough-ins are finished.
Key Deliverables
- What it is: The tangible outputs expected at different stages of the project.
- Why it matters: Defines what “done” actually looks like.
- How it’s included: Each phase has a checklist of deliverables that must be finished before moving on.
- Example: Approved blueprints or installed HVAC systems.
Resources
- What it is: The materials, equipment, and labor needed to complete the job.
- Why it matters: Makes sure teams have what they need when they need it so they can work as planned.
- How it’s included: Resources are given to tasks based on availability and priority.
- Example: Concrete mixers scheduled for foundation pouring.
Contingency Plan
- What it is: Plan B for when things don’t go as expected.
- Why it matters: Helps steer clear of costly delays.
- How it’s included: Risk assessments are done in advance, with alternative solutions mapped out.
- Example: A backup supplier lined up for materials in case of shortages or delays.
How to Create a Construction Schedule in 6 Steps

Fewer delays, better resource optimization, happier clients, and successful projects. These are goals most construction teams share. A schedule can help make them a reality.
So, how do you make one? Here are some steps to follow:
Step 1: Outline the Project Scope and Objectives
What are you actually trying to achieve? What should the outcome look like? How will it function?
These questions help you define the project’s scope. They’re important, too, because they set the scene for the entire build.
Take action: Write a one-sentence project goal. If you can’t sum it up, your scope might be too vague.
Step 2: Gather Resources and Materials
You know what. Now, it’s time to think about how.
How will you construct a four-bedroom home? You’ll need resources like labor and machinery. You’ll also need materials.
Take stock of all the odds and ends required to bring the project to life. List them out.
Take action: Make two lists—one for resources (people, equipment) and one for materials. Missing something? Fill the gaps before you start.
Step 3: Develop a Work Breakdown Structure
A work breakdown structure goes right down into the nitty-gritty of the project—the day-to-day. Consider the following:
- What’s the first task that kicks things off?
- What major phases will the project go through?
- Which tasks will take the longest to complete?
- What absolutely must be done before anything else can move forward?
Then, list down individual tasks under each phase. Keep things bite-sized—big tasks should be broken down.
Take action: Sketch out the project in stages. Assign estimated timeframes to each major phase.
Step 4: Schedule Tasks
It wouldn’t be construction scheduling without, well, a schedule. This is where you put a timeline to the tasks at hand.
You’ll want to reach out to subcontractors and suppliers and see when they’re available. For specialists or in-demand services, prioritize booking them early.
Be aware: You may need to change this in the future. That’s okay—build flexibility into your schedule.
Take action: Set up a rough draft of your schedule and highlight any tasks that have strict deadlines or dependencies.
Step 5: Identify Interdependencies
Interdependencies really are the bane of a construction project. They’re what limit flexibility and stop agile teams in their tracks.
Think about it this way—you can’t bring in the painters before the wall is built.
So, flag those tasks that depend on others. Look for areas where a delay in one task could impact multiple others. Then, find ways to reduce bottlenecks.
Take action: Map out dependencies visually, whether with a Gantt chart, a whiteboard, or good old-fashioned sticky notes.
Step 6: Monitor and Adjust as Needed
Your construction schedule is not a set-and-forget document. It’s a living, breathing, evolving thing.
Make regular time throughout the project’s duration to revisit it. Make edits as things change so everyone stays on the same page.
Take action: Set a recurring check-in (daily or weekly) to review progress and make real-time schedule adjustments.
RELATED ARTICLE: How To Ask for a Deposit Politely: A Contractor Deposit Guide
Construction Schedule Examples
Construction schedules aren’t one-size-fits-all. Every project has different ways of getting from start to finish. That’s why it’s crucial to organize your schedule in a way that actually works for the job.
Below are two examples: one for a kitchen remodel and one for a deck build.
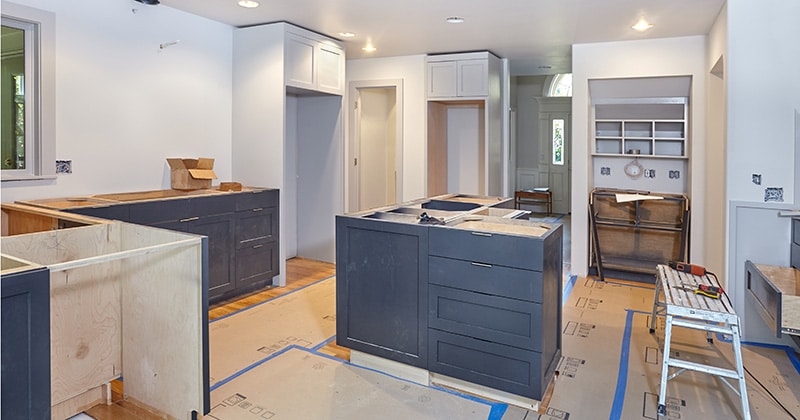
Construction Schedule Example 1: Kitchen Remodel Schedule
How it’s organized: This plan breaks the remodel into phases. Tasks are listed in the right order so tradespeople aren’t stepping on each other’s toes.
It also accounts for things like permit approvals and delivery lead times.
Kitchen Remodel Schedule Breakdown
Phase 1: Demo and Prep (Week 1-2)
- Tear out cabinets and appliances.
- Haul away debris, prep walls and subfloor.
- Confirm delivery dates for materials.
Phase 2: Rough-Ins (Week 3-4)
- Run new plumbing and electrical.
- Schedule inspections.
- Insulate and close up walls.
Phase 3: Installations (Week 5-6)
- Lay new flooring.
- Install cabinets and countertops.
- Hook up plumbing fixtures and appliances.
Phase 4: Finishing Touches (Week 7-8)
- Paint, backsplash, and trim work.
- Final plumbing and electrical connections.
- Cleanup and client walkthrough.
Resources:
- Labor: General contractor, electrician, plumber, flooring installer, and cabinet installer.
- Materials: Cabinets, countertops, tiles, flooring, fixtures, appliances, and paint.
- Contingency: Extra time for late deliveries, backup suppliers, and flexible subcontractor scheduling.
Construction Schedule Example 2: Deck Build Schedule
How it’s organized: This schedule is task-driven and keeps the weather in mind. You can plan all you want, but rain doesn’t care.
The timeline is compact, too. But everything’s structured to make sure one delay doesn’t derail the whole thing.
Deck Build Schedule Breakdown
Phase 1: Site Prep and Foundation (Day 1)
- Clear the area and mark the deck layout.
- Dig and pour concrete footings.
Phase 2: Framing and Joists (Days 2-3)
- Install ledger board, beams, and joists.
Phase 3: Decking Boards (Day 4)
- Lay out and fasten boards.
- Trim edges, spaced properly for drainage.
Phase 4: Railings and Stairs (Day 5)
- Install railings and balusters.
- Build and secure stairs.
Phase 5: Sealing and Inspection (Day 6)
- Apply sealant or stain.
- Final walkthrough for any touch-ups.
Resources:
- Labor: Carpenter and general contractor.
- Materials: Lumber, screws, sealant, and concrete.
- Contingency: Extra time for rain delays, backup supplier for lumber, and flexible sealing schedule based on drying conditions.
4 Pro Tips on Construction Schedule Management
Get the most value from your construction schedule with these expert tips:
- Audit how you currently approach schedule management. Are there any tasks or steps that stand out as a bottleneck?
- Investigate different types of schedules. See which one makes the most sense for your team and projects.
- Research construction scheduling software. It’s a solution that makes scheduling that much easier. Add it to your line-up of tools and apps for building pros.
- Make a mental note to add buffer time to your upcoming schedules. The unexpected is bound to happen, so prepare wisely.